offering downloads via p2p using bittorrent
31 mar 2010
![]()
motivation
if you ever wanted to publish a file via bittorrent, here is a small guide how to do it with linux (using a shell). this guide - in contrast to most other guides found in the net - is NOT about downloading files using bitTorrent, instead is is about PUBLISHING FILES! first of, our tools:
bittornado [1] for tracker/seeder (that is the central part of your hosting service) BitTornado-0.3.17.tar.gz worked, while net-p2p/bittornado-0.3.18-r2 did fail
mktorrent [7] to create a .torrent on the shell
ktorrent [2] used as ‘normal’ client (that would be a user of your service)
bittorrent is basically nothing more than a simple protocol how to copy files and how to enforce integrity by hashing a big file into chunks of smaller files of equivalent 1Mib blocks (size may vary from .torrent to .torrent). a mixture of all related computers hosting chunks are called the swarm. if in doubt just read the wikipedia article [3] to get the terms & concepts. a very nice matrix about bitTorrent clients and tracker capabilities can be found at [4].
the basic idea about hosting downloads with bitTorrent
open source projects often offer files via bitTorrent. to offer a file in bitTorrent one has to do this:
create a .torrent of the file or directory one wants to offer
host a tracker (which manages the swarm, usually a tracker is a central server)
connect a ’seed’ to the tracker, so that others can download the file and spread it further
test & monitor the tracker or swarm
security
in general this is nothing new as this technique is used already for years. i would like to create a very lightweight documentation about how these 4 points are achieved with ease, so here we go:
(1) create a torrent
let’s use one of my 23Mib screencasts to create a .torrent for (just use whatever you want) using mktorrent [7]
# wget 'http://lastlog.de/misc/wordpress/libnoise-viewer.ogv'
# mktorrent -a http://myregisteredname.dyndns.org:6969/announce -c 'a screencast showing what libnoise-viewer does' libnoise-viewer.ogv
mktorrent 0.4 (c) 2007 Emil Renner Berthing
Hashed 92/92 pieces.
Writing metainfo file... done.
Now we created the libnoise-viewer.ogv.torrent as it can be found in the directory after we used mktorrent. for my private computers i use a dyndns.org DDNS service which is updated on every reconnect of my firtzbox.
(2) host a tracker
in my case i host this tracker at a dialup connection using dsl. this might not be ideal (but redundancy might get better if clients use a dht, more on that later). since the computer is behind a nat (network address translation) we have to forward some ports (sockets) to the server hosting the tracker behind the nat. this can be done by using your fritzbox configuration dialog (or equivalent, whatever you use - i will just pick that example with a fritzbox) .
# mkdir torrent;
# mv *.torrent torrent/
# bttrack.py --port 6969 --dfile dstate --logfile tracker.log --allowed_dir torrent/
# netstat -tulpen
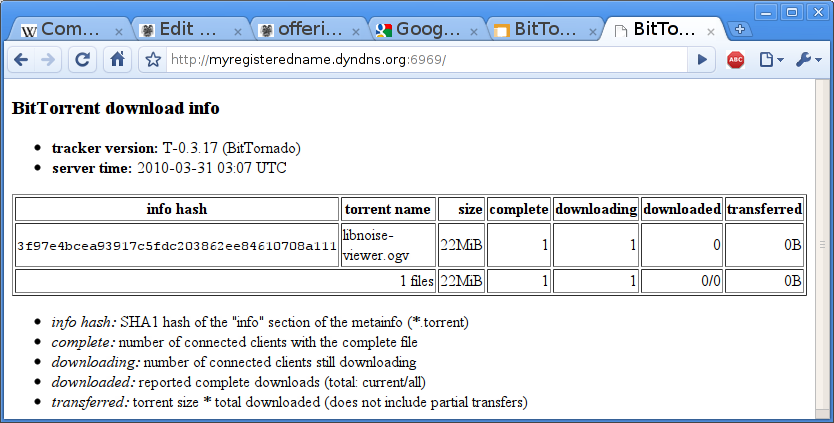
tcp 0 0 0.0.0.0:6969 0.0.0.0:* LISTEN 0 234712 21631/python2.5we could check for html output with curl as well (curl should basically installed on every linux installation)
# curl localhost:6969the output should be some html code with tracker version and a list of torrents (tracked files)
so we see that the bttrack.py service using tcp with** port 6969** is up and running. if you are behind nat - as i am - also check from a remote machine, if the service is working (can also be done using curl).
if you need to configure a fritzbox or other socket/html based router which has no direct internet configuration enabled you can also use a ssh redirect. in my case i can access my server behind the nat with ssh. so if you want to configure your fritzbox as if you had your computer plugged in the local lan swith see a different documentation of mine at [8] (german only).
i used the tcp portrange from 6881 to 6999 for the tracker as well as for the seeder connections, so forward these ports.
(3) connect a ‘seed’ to the tracker
without doing this nobody will be able to download anything, since nothing is there! so let’s add some data. be aware that if that seed is behind nat as well it might not work at all.
# btdownloadheadless.py --responsefile /root/torrent/libnoise-viewer.ogv.torrent --minport 6881 --maxport 6999 --max_upload_rate 20 --saveas /root/libnoise-viewer.ogv
saving:         libnoise-viewer.ogv (22.8 MB)
percent done:   0.0
time left:      Download Succeeded!
download to:    /root/libnoise-viewer.ogv
download rate:
upload rate:    12.4 kB/s
share rating:   oo  (0.4 MB up / 0.0 MB down)
seed status:    0 seen recently, plus 0.076 distributed copies
peer status:    1 seen now, 7.6% done at 6.7 kB/s
so now you have to upload the libnoise-viewer.ogv.torrent to somewhere, or copy it to your client directly.
you might want to have a look at the other parameters as for instance:
–max_upload_rate
maximum kB/s to upload at (0 = no limit, -1 = automatic) (defaults to 0) –minport
–maxport
you can also use several of these clients from different machines to ensure redundancy here as well. it will scale pretty well! you can also use any other torrent program as ktorrent or rtorrent for instance.
(4) test & monitor the tracker or swarm
use rtorrent or ktorrent and import the libnoise-viewer.ogv.torrent and see if the download works. if it works you are done!
monitoring is basically done by visiting the tracker, as:
there must be at least one seed (that is your seed)
see the logs created by the tracker, that is: tracker.log
you can also do bandwidth monitoring, ktorrent has a nice monitor included (in case you are seeding) but you most likely don’t need bandwidth monitoring for the tracker as it won’t use much bandwidth
both services might open many connections and some firewalls can’t handle this well since the resources needed for ‘connection tracking’ in statefull firewalls will be exceeded soon resulting in strange effects.

(5) security
i did run the script as root but if you want to establish a service which should be secure and reliable DO NOT RUN AS USER ROOT! just create a new user and run it as this new user. this is very easy since bittorrent does NOT use any privileged ports (1-1024) but bitTorrent uses unprivileged ports instead (all others as 1025-65535). in my example even less.
if you have frequent issues with the tracker you could use minit [5] to restart the service automatically.
summary
i hope this helps you to offer big downloads easier. just keep in mind that you have to follow two rules:
for every new download you need to create a new .torrent file
you need to inject a seed for every .torrent via a tracker
using bittorrent will show it’s full potential when we migrated to ipv6 since nat is (asipv6 mentioned in about every 5th posting on my blog) is a real problem.
errata
since the tracker seems not to be stable for both versions of bittornado we now use bittorrent instead. the concepts apply 1:1 so the adaption isn’t very complicated
be aware that NAT will most likely kill a lot of upload potential of the clients since most clients will not have a direct valid ipv4 address but will be behind NAT all the time with improper port forwarding. this will then result in much less throughput and clients will have small download rates in general. one exception to this rule will be two clients which can utilize the full potential if one has configured proper port forwarding while the other is behind nat.
links
- [1] http://en.wikipedia.org/wiki/BitTornado
- [2] http://ktorrent.org/
- [3] http://en.wikipedia.org/wiki/BitTorrent_(protocol)
- [4] http://en.wikipedia.org/wiki/Comparison_of_BitTorrent_clients
- [5] http://www.fefe.de/minit/
- [6] http://www.linux.com/news/software/applications/8230-bittorrent-for-linux
- [7] http://torrentfreak.com/how-to-create-a-torrent/
- [8] http://lastlog.de/wiki/index.php/Ssh